


Table of Contents
Ready to transform your store?
Try Customily for freeDo you sell print-on-demand products on ETSY or are thinking about it? Well, you arrived at the right place. Let me show you why selling custom products on Etsy is a great idea, and how to sell them at scale using a print-on-demand provider like Printify and a product personalizer like Customily.
Believe me, after reading this article you will be ready to sell personalized products on Etsy LIKE A PRO 🚀
📌 UPDATE! JULY 2023:
Customily 2.0 for Etsy has been launched! Now you can automate fulfillment with different print-on-demand providers like Printify and Printful. Check out this article to learn more about this new amazing update, and TRY IT FOR FREE HERE.
Let’s start with the basics, I bet many of you are thinking why should I invest efforts in personalization when I can sell regular products and still make money with it? Well, I have some news for you: PERSONALIZED GIFTS was the number one search term on Etsy last year, did you know that?
That’s our first important fact: personalization is already popular and people are searching for it. The public is there.
But if you need more facts, read this. Studies show that people are willing to pay 20% or more for a personalized or exclusive product. And 46% of consumers say they are happy to wait longer to get a customized product.
So, what does this mean? It means you can increase the price of your products and have better margins for each personalized product that you sell. The cost of fulfillment and shipping will be the same, but the price of your product is higher, resulting in more revenue for you.
Also, with personalization, you can increase your customer’s engagement and loyalty because people just love to feel unique. Offer them a fun shopping experience done right, and you will keep them engaged on your page and will likely return for more. It will also impact your world of mouth marketing, referrals, and overall customer satisfaction, which eventually will result in more customers and more sales for you!

Now that you know why personalization is a great idea, let me warn you about something. Selling custom products on Etsy can be awfully manual, so if you are planning on selling at scale, how is this possible to achieve without wasting time?
Well, get ready to take some notes because I will explain to you the best way to do it using PRINTIFY and CUSTOMILY.
If you are just starting on Etsy and you get like a couple of orders a day, you probably have time to manually create a custom design each time a customer makes a personalized order and then send it to your print-on-demand supplier.
But what happens once your store starts growing and you get more and more orders each day? Because that’s what we all want, right? Growing and selling as much as possible.
If you are serious about this and your store grows, doing things manually won’t be an option anymore. It would be very time-consuming and will only bring huge delays in fulfillment. Believe me, no customer wants to wait weeks to receive its order.
So, let’s see now how to complete multiple personalized orders at once, using Customily to automatically get all the custom print files, and Printify CSV order import to fulfill all of your products super fast.
Step 1: Connect Etsy with Printify!
Let's start from the beginning: you must create an account on both, Etsy and Printify.
Once you have them ready, it's time to connect them!
- Go to Printify dashboard.
- Click on My Stores, and then on Add a new store.
- This will open a new page where you must select Connect on the Etsy tab.
- Your Etsy account will open, and will take you to a page titled "An application would like to connect to your account". Scroll down and click Grant access.
- Once you're back on your Printify store, go again to My Stores.
- Now click on Etsy's Settings button to go to the store setup.
- Go to Preferences, on your left.
- Scroll down to Order approval and make sure you select the Manual option.
- Scroll down and Save.
- Your accounts are connected!
Step 2: Create a listing on Etsy!
Now let's create a listing on Etsy by completing all the information the platform asks you, as accurately as possible.
- Go to the left dashboard, and click on Listings.
- Then click on Add a listing on the top right and start filling in the information (images, videos, product details, inventory, prices, variations, etc.)
- Make sure to select Printify on your "Production partners".
- Scroll down and complete until you finish.
- When you're ready, publish your listing.
❗ TIP !! Use attractive product pictures that clearly show that the product can be customized. And add as many customized examples as possible on the product gallery. Another good idea is to add an image that explains how the personalization will be done, so customers are sure about the process before making a purchase. Repeat all this information on the product description as well, so customers know exactly what to expect.
Step 3: Connect Etsy with Customily!
Now let’s get Customily installed on your Etsy store. Customily is a tool that makes it easy to sell custom products online. How? Well, they simplify the shopping process by showing customers-friendly options and a live preview of the personalization. Then, they automatically create the print files needed to fulfill the custom orders, which can be used with any kind of POD product, for printing or engraving.
If you don’t have an account, you can click here to see the available plans. Then, subscribe to one of the preview + production plans, so you’ll get the printing files and create your account.
Once in your account, it’s time to connect it with your Etsy store.
- First, make sure you are logged in to your Etsy.
- Open Customily and go to Manage options on the left menu.
- Click Settings on the right, and go to the Advanced tab.
- Click Connect to Etsy.
- Your Etsy account will open, and will take you to a page titled "An application would like to connect to your account". Scroll down and click Grant access.
- Once you're back in Customily, scroll down and Save settings.
- Your accounts are connected!
Step 4: Add personalization options to your Etsy product!
Now let’s create the templates on Customily so you can add personalization options to your Etsy products.
In this step, you actually have unlimited personalization options to choose from, so the best advice would be to test the app by yourself and try all the things you can do with it.
The most important thing you need to take into consideration are:
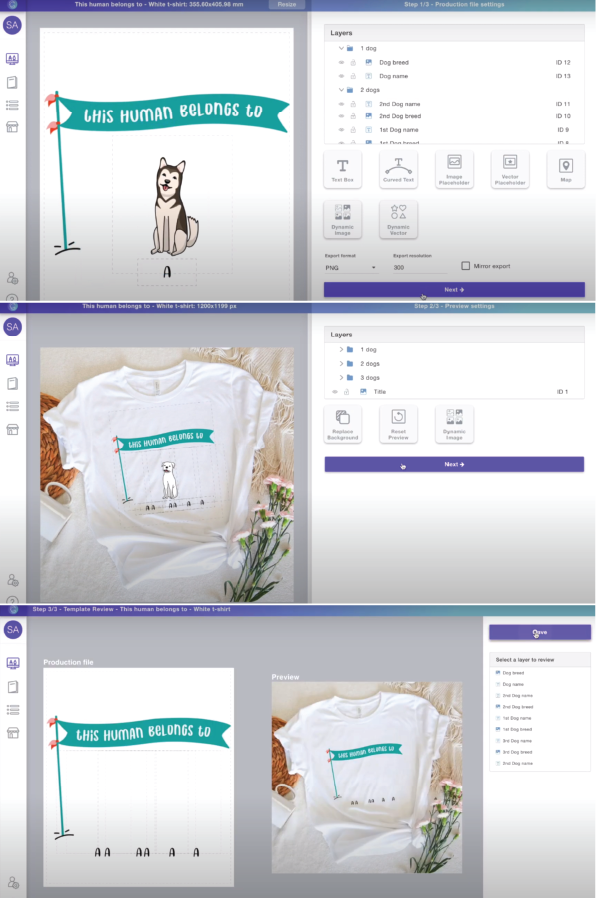
- When creating a Customily's template you will have to complete 2 steps, and then connect the template to your product.
- In the first step, you must set up all the information needed to automatically create the print files from your customer's personalization. To do this right, you will need to get the print area information from the Printify product you want to personalize. This way you will be sure your file is configured correctly and the printing will be done perfectly.
- After setting the file dimensions, you will have to add all the design elements. Here you have total freedom, and everything will depend on the personalization options you want to add to your product. It could be texts, images, clipart, and more. Bear in mind that Customily has a dedicated Support Team available that can assist you with your template configurations, so don't panic! 😉
- In the second step, you will set the preview or mockup that customers will see when personalizing their products.
- Here you just need to pick a nice photo for your background, and simply place all the elements you created before on the product so they look real.
- When your template is done, save it and you're ready to connect it to your Etsy product.
- For this, go to Manage options, and click Option sets.
- Then click on New Option set from template.
- This will automatically create all the options customers will see on the product: the dropdowns, swatches, text inputs, and more.
- Scroll down and click on Save option set.
- You can create an option set automatically from the design you just created, to make sure all the options for your design are there. You can also create an option set manually, or work with an existing option set if you prefer, but the automatic way is the best choice.
- With the option set ready, you can link it with the product.
- Again go to Manage options, and click Link.
- Choose the product you want to connect to, and then select the template and the options set you just created.
- Now your listing is connected with Customily! Whenever customers place an order, an email will be sent to them right away so they can personalize it 😍
Step 5: Fulfill your orders in bulk with Printify!
Now it's time for the last step: let’s learn how to fulfill all orders for your product on Printify.
First, you'll have to go to Etsy and download a CSV of all the orders, so you can get all the order numbers and shipping information.
- Go to Settings on your Etsy's left dashboard.
- Click on Options, and go to the Download data tab.
- Scroll down to Orders.
- Select Orders on the type of CSV.
- Select the current month and year.
- Click on Download CSV.
Then, you must create a new CSV file with Printify's specifications in order to import all your order's information for fulfillment.
You can download a Printify Template with all the columns already set, so you're sure you won't miss any information.
- Go to your My Orders page on Printify.
- Click on CSV Import/Export and choose Import CSV file.
- Scroll down to Helpful links and click on CSV template.
Now that you have a template of the CSV file needed, you must populate it with all the information needed.
❗ Tips and suggestions:
- Use the Etsy order number both on the External ID and Label columns, so you can easily identify each order.
- On the Shipping method column use "1" to indicate regular shipping and "2" to indicate express shipping.
- Copy and paste all your customer's information from the Etsy file you already downloaded.
- To complete the Print provider ID, Blueprint ID, and Variant ID columns you will need another file from Printify. Go back to the Helpful links section, on the Import CSV file page. There, download the Print provider and product information file, which is right below the CSV template you downloaded before.
- Open the file and search for all the information about your providers and their products.
- To add the print files from each order, you can go to Customily: click on Manage options, then Orders, and search each order by its ID number. There you can open the production file and copy the URL link to paste it onto the CSV file.
Once your CSV is ready it's time to upload it!
- Go back to Import CSV file page.
- Upload your file.
- All of your order's information will appear on the screen.
- Scroll down and click Submit orders.
- As we selected Order approval: Manual at the beginning, you will have to select the orders again and click on Submit order to confirm the operation. You can review them first to make sure everything is ok.
- Once the orders are submitted, that's it!
- Printify will now fulfill and ship them to your customers!
Amazing right? Now you can sell custom products on Etsy like a pro, in a very efficient and fast way. Not only you can fulfill orders automatically, but your customers can also see a live preview of their personalization, making sure they don’t make any mistakes and don’t want to send their orders back once they get them! Believe me, you will be saving not only time but money too!
If you're interested in this content you can also visit our YouTube channel for a video version of this guide. And if you haven’t tried Customily or Printify yet, what are you waiting for? Give it a shot, you will be surprised at how easy it can be to manage your custom Etsy shop! 🤩
Let us know in the comments below if this guide was useful, and if you have any questions about the setting of your custom products!


